The Aero cloner is a very simple device to build. It will perform just as well as expensive aero cloners costing hundreds of dollars. It operates on the same principle as every other aero cloner on the market, which is that the stems of the cuttings are suspended in an air space being misted by a fine spray of tiny flying water droplets.
Some aero cloner variations... Some aero cloners work by way of the water being sprayed through fine mist spray heads, others like the Rainforest cloner work by a spinning rotor which flings small water specs at the stems. There are even cloners on the market which use ultrasonic humidifier fog being pumped thru a chamber holding the stems.
This aero works on the "bubbling bucket" principle, where tiny water droplets are created by the action of the air bubbles bursting at the water surface, sending a mist of water flying through the open air space above the waterline where the stems are located.
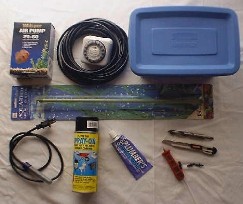
The parts list...
clockwise from top left:
1. One - good quality dual outlet air pump. I recommend the whisper 20/60 or the pulsar four. both are @ $20.00
2. One - cheap pull up tripper type timer about @ $5.00, please don't try aero cloning without the timer, it is critical imho for fast rooting.
A short length of 1/2" rubber fuel line or vinyl tubing.
Some fish tank airline or (preferred) some soft flexible vinyl drip line for the air bubblers.
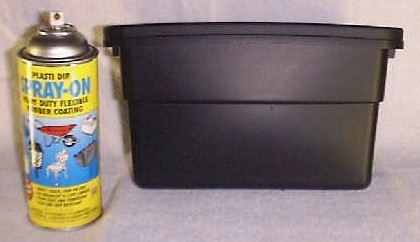
3. One - Rubbermaid roughneck 1 gallon tub with lid @ $1.00
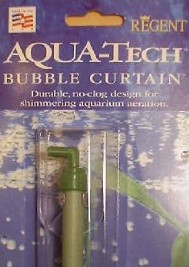
4. Two - aquaculture "bubble curtain" 10" bubble wands. @ $3.50 each
5. Assembly tools: drill bit(s), sharp box cutter knife, drip line punch and coupler fittings (optional).
6. One - tube of Goop brand plumbers adhesive @ $4.00
7. One - Spray can of Plasti -Dip brand "Spray-On" black rubber coating @ $6.00.
8. One - 7-1/2 watt fishbowl heater. Walmart @ $6.00
I have great luck using the cheap heater. However, please note that the small heater has no thermostatic control, depending on your room temperature; it may need to be connected to a timer and monitored to be certain that you don't overheat the water. So, if you can find a fully submersible thermostatic controlled heater that will fit in the tub without getting in the way of the air bubbles, I highly recommend doing so. There are several on the market which will mount along the bottom of the tub, parallel to the bubble curtains, use 25 watts or smaller size. You can also use a thermostat controlled heating mat or place the entire cloner tub in a larger tray of water with an aquarium heater if you have a submersible unit which is too large to fit in your tub.
The bubble curtains...
The Aqua Tech brand "bubble curtain" or equivalents are the only bubble device I'd recommend for bubble cloning. They are the least restrictive to pump air thru, and because of their hollow tubular design they produce a very uniform bubble coverage throughout the entire length of the wand. Plus they're cheap.
Cut the bubble curtains to fit the length of the tub. Remove the end cap and cut the wand to length using a sharp box cutter or razor blade knife. Replace end caps.
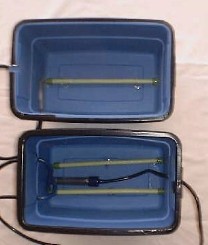
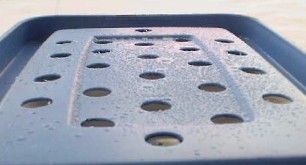
Picture of two versions of the cheapo...
The cheapo works great with one wand or two. For this project lets use two wands. Note picture also shows the location of the little heater installed. Use a dab of goop on the heaters suction cup to hold it in place between the wands.
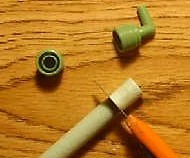
Glue in the wand holding clips... The suction cups provided with the bubble curtains are prone to failure, when the cups stop sticking the air wand floats to the surface and the bubbling action stops working, causing failed clones. Pull the clips out of the suction cups and glue them in place using the Goop plumber's adhesive to the bottom of the tub. You should rough up the gluing surface by scratching it with a knife or coarse sandpaper for a better grip.
Allow the glue to dry for at least two days to be sure its fully cured.
The Rubbermaid one gallon tub has a ridge molded in about 2-1/2" from the top. This will be the waterline. For a nice sanitary assembly, punch two drip line couplers thru about a 1/4" above the ridge for the airlines to exit the tub.
Spray on the plasti dip black rubber coating...
The tub needs to be coated to prevent light from penetrating the tub and slowing down the rooting process. Normal spray paint don't stick and is too light transparent. The plasti dip sticks to the Rubbermaid very well and with two or three coats fairly thick and very light proof. Spray and dry in a very well ventilated area.
You can get away with a few layers of duct tape, or a layer of "anti-corrosion pipe wrapping tape". But, the Plasti -Dip I've found to be the best solution for light proofing and neatness.
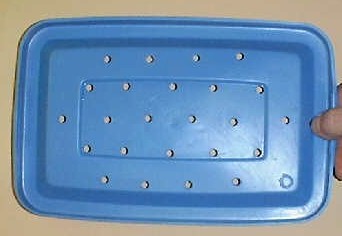
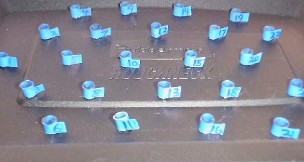
Drill the lid for the clone support tubes
View of inside to see hole pattern used.
For small clones, the 1/4" o.d . x .170 i.d . flexible drip line works fine for support tubes, but rooted clones can be tricky to remove from small the lid holes. Note tape tabs to keep the smaller supports from falling thru the lid, and numbering to identify the clones.
Optional larger support tube holes (recommended).
Using the 1/2" tubing for support tubes makes it much easier to remove the rooted clones from the lid. Number the holes to identify the clones later on. With either size holes, the *support tubes are cut to a maximum length of 1/2" and split down one side to be able to remove the rooted clones.
*It is important to have the support tubes cut short (@ 1/2" max). The original plans had longer tubes which caused problems on some cuttings.
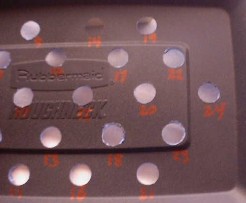
TESTING
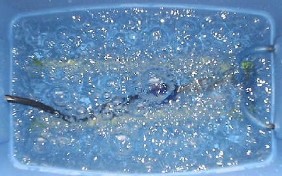
To test a newly built unit to see if the bubbling is going to do the trick...
Simply dry off the tubs lid and place it on the tub, turn on the air pump and let it run for about five minutes. After around five minutes have a look at the inside of the lid.
It should look like the above pictured lid. Not quite soaking wet yet, but obviously getting hit by the water droplets. Now put the lid back on and run it for another five minutes, it should be completely covered with those tiny water specks or totally wetted.
If its not "completely covered" all the way across the surface, then your pump is probably too weak.
Preparing the clones for aero tub cloning
The following information applies to all types of aero cloners , not just the aero tub.
There are a few things that need to be done in order to get the best results when aero cloning. Preparing the future cuttings before they're cut from the donor plant. Followed by final trimming, soaking, and leaf trimming and lastly, cutting to length and loading the cloner .
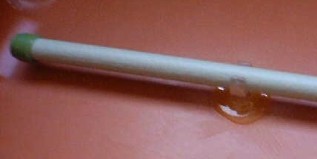
Before cutting the cuts from the donor, hold a support tube next to the future cutting and determine whether or not any nodes will be inside of the support tube.
If there are any nodes in that area, trim them flush to the stem with a cuticle nipper or similar tool. Do the same for all the growth tips you plan on taking for this batch of clones. Allow the trimmed mom to heal up overnight before you actually take the cuttings off the donor. This step will keep the cuts from trying to make roots inside of the tubes, and will help prevent stem rot within the support tubes.
Take the cuttings the next day...
Trim any nodes from the portion of the stem that will be below the support tubes. I use a cuticle nipper for this task and cut them flush to the stem.
Allow all the cuts to soak for at least a half hour in cool tap water. The water soak will get all the cuttings nice and turgid, and the chlorine in the tap water will help sterilize the cuttings.
Load the finished cuttings into the support tubes in the lid and cut the stems to length with a razor blade. You want the stems to hang about one inch below the tubes.
While you are loading the tub, the air pump should be running to start the wetting process, let it run for about an hour before you set up the air pump on the timer.
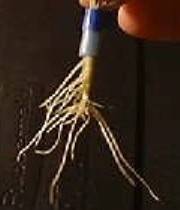
Be patient...roots will develop soon...
The best part of aero cloning is the satisfaction of seeing the roots develop . Some strains will start rooting as fast as five days, others will take as long as two weeks. Most will at least show root bumps starting within one week, with roots blasting out a few days after the bumps. Remember though, that a clone showing root bumps is ready for transfer to a hydro medium or system where it can start receiving weak nutes
Aero rooted clones are perfectly suited for transfer to straight grow rocks in hydro systems like ebb & flow or deep water culture. They are also suitable for soil growing if they are transplanted properly at the right stage of rooting.
These Documents contain information gathered from many Online Communities and all possible references have been given to the authors of each individual article. For any discrepancies in this please contact "overgrow2@gmail.com" ....ps enjoy